Have you ever put k-cups into a coffee maker only to find your countertop all messed up due to the k-cup exploding? Many users have complained about their k-cups exploding as soon as they put them in the coffee maker. Not only is it scary, but it is also super inconvenient as you will have to wipe off your countertop in the morning when you are already late for work.
So why do k-cups explode? Well, the main reason is that they are filled with too much air. But that’s not the only reason why. Read on to discover all the reasons why k-cups tend to explode and how you can fix this problem.
How Does a K-Cup Work?
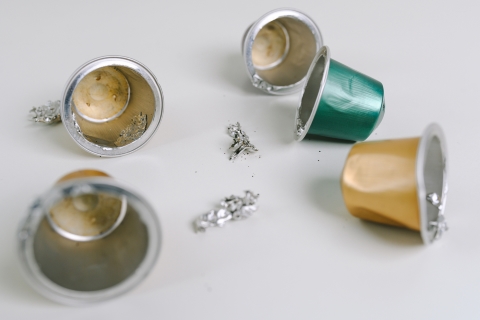
Before we get into explaining why K-cups explode, let’s first learn what they really are and how they work. A K-cup is a small plastic pod or cup that contains ground coffee, sealed off with a foil lid. K-cups come with built-in filters and provide you with the easiest way to make your morning cup of joe.
Just toss them into your Keurig coffee maker, and you will get a freshly brewed cup of coffee. Once you have put the k-cup into a coffee maker, you will hear a click, and the brewing will begin. During the brewing process, the machine pumps water into its heating chambers through pressurized hoses. The water is then heated to the appropriate temperature required for making coffee.
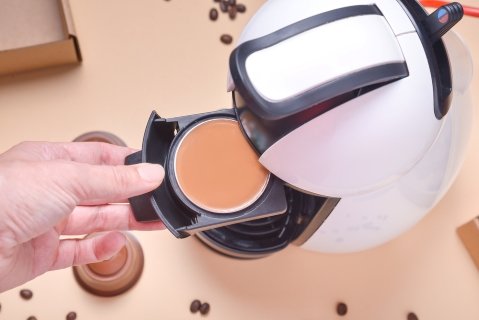
When the water reaches the right temperature level, it is pushed into a hose at the top of the coffee maker’s brewer. This brewer has a small opening right near where you put the k-cup. As soon as the water reaches there, the coffee maker starts puncturing the k-cup’s lid to let the water enter into the k-cup that contains ground coffee.
The hot water mixes with ground coffee and passes through the paper filter and a hole at the bottom of the K-cup, from where the brewed coffee is led out into your mug.
As you can see, making coffee with K-cups is incredibly easy. However, they may sometimes explode, causing the coffee to disperse all around your countertop and your coffee maker. Read on to learn why this happens.
Why Are My Coffee Pods Exploding?
The K-Cup is Filled with Too Much Air
One of the main reasons why coffee pods explode is because they are filled with too much air. Since this is a manufacturing fault, you can’t do anything about it. If a k-cup is filled with excessive air, this air will cause the pressure in the cup to burst as soon as the coffee maker punctures it.
While there is nothing you can do about it, you should inspect your k-cups before tossing them into the coffee maker. If there is too much air in it, you can spot it by looking at the appearance of the foil lid. If the lid of the k-cup is puffed up, it means that it has too much air.
But that does not mean you should let this k-cup go to waste. You can poke a tiny hole into it with a needle or pin to let the excess air out before tossing it into your coffee maker. The needle will then pierce through as usual as long as the lid is still taut and intact. If you damage the cup in any way, then the needle won’t be able to puncture the lid.
The Seal is Weak
Another reason why the K-cup may explode is that its seal is weak because it hasn’t been sealed properly. So before you toss in the K-cup, make sure to inspect its seal. If it looks weak, do not use the K-cup and file a complaint with the manufacturer.

Even if you were to take the risk and use the K-cup with the weak seal, it would brew a really bad cup of coffee as the ground coffee would have been exposed to air the entire time. Air and moisture in the air affect the quality of the ground coffee in the K-cups.
One or Both Needles are Clogged
Keurig coffee makers have needles to make punctures in the K-cups. One of these needles pokes the top of the k-cup, whereas the other pokes a hole at the bottom. If these needles are clogged, they won’t be able to puncture holes properly. As a result, your K-cup will explode.
To ensure that your K-cups don’t explode, make sure to inspect your Keurig coffee maker every once in a while. The needles should always be in pristine condition to be able to puncture holes. You can also take a pulled-open paperclip and use its straightened end to clean the needles. You can use this method to get rid of any dirt or buildup in the needles.
But don’t use the coffee maker just yet. Make sure to run water through the coffee maker so that any dirt that is left behind is flushed out.
You’re Brewing at High Altitude
Brewing coffee at a high altitude can affect your K-cups. If you are using your coffee maker with K-cups at a height of more than 6,000 feet, they are bound to explode, as there is too much pressure in them at this altitude.
Once again, you can prevent this from happening by poking a small hole into the K-cup with a pin to let some of the pressure out. Only then should you toss it into the coffee maker.
Your Water is Too Soft
Softened water causes the coffee grounds to swell too much. As a result, when the hot water hits them, there is too much pressure, and it causes the K-cups to explode. You can avoid this by using bottled water to make coffee in your coffee maker. Do not use a water softener to make coffee with K-cups because in addition to this problem, the lack of magnesium and calcium tends to make coffee watery.
Your Pods Don’t Match Your Machine
K-cups only work if they are the right match for your machine. If they are not right for each other, the K-cups will explode. For instance, you cannot use Nespresso pods in a Keurig, and vice versa. Moreover, many coffee pod brands market their products to be compatible with Keurigs. So always make sure that you are buying compatible K-cups with your coffee maker. Make sure they work with the model of your Keurig. You can also visit the coffee maker’s website to see if they sell compatible pods.
You’re Using Refillable Cups
If you use refillable cups, they are prone to explode as a result of the lever and hinge of the K-cup chamber wearing out over time. If that’s the case, your K-cup will not fit into the chamber firmly and explode.

If that’s the case and the lever and hinge of your k-cup chamber are damaged, you can use a rubber gasket inside the brew head chamber to ensure that the pods sit firmly and there is no friction. They are very cheap and will improve the brewing process greatly!
You’re Using Fine Ground Coffee
If you are using instant or reusable coffee pods, steer clear of fine ground coffee. Fine ground coffee leaks through the holes in your pods like sand and creates a mess everywhere.
Make sure to only use coarse-ground coffee with your refillable or reusable pods. If you are not sure what the ground texture is of your coffee, don’t take the risk. Just buy coarse ground coffee so that you are sure of what you are putting in your reusable coffee pod.
FAQs
If your Keurig is spewing coffee grounds in your cup, it means that the coffee grounds have made their way into the dripping needle of the machine. You will need to clean this needle by removing it and following the cleaning instructions mentioned in your coffee maker’s manual.
Once you are done, start the machine to brew just some water to see if the grounds are still coming out. If they are, repeat the water-only brews to ensure that there is no residue in the needle. You should also descale your brewer every once in a while to prevent this from happening.
Yes, you should. You should shake a new K-cup every time before you put it in the coffee maker. It is to ensure that the coffee grounds are mixed properly and any flavor in them is equally distributed. Sometimes, the grounds may be packed too tightly at the bottom of the cup, and giving them a little shake will improve your coffee’s taste.
Unplug and turn off your coffee maker and remove the pod holder from the brewer. Next, remove the funnel from the pod holder and use a paperclip to clean the needle on the underside of the pod holder. Pull open a paperclip and use its straightened end to clean the needle. Now rinse the pod holder with water thoroughly under a sink.
Once done, clean both the ends of the entrance needle under the brewer’s head with the paperclip. Now reassemble the pod holder and run water-only cycles twice without putting a K-cup in. This will clear out any residue left behind in the needle.